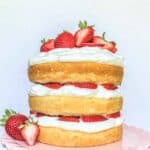
Strawberry Shortcake Layer Cake
This Strawberry Shortcake Layer Cake has three layers of tender yellow cake with fresh whipped cream and fresh strawberries! I think I could eat this every day, all summer long!
Servings 6 slices
Ingredients
Cake:
- 1 ½ cups cake flour (see note)
- 2 ½ teaspoon baking powder
- ¼ teaspoon salt
- 5 tablespoon unsalted butter, at room temperature
- ¾ cup sugar
- 1 teaspoon vanilla extract
- 2 eggs
- ⅔ cup buttermilk (see note)
Whipped Cream:
- 1 ½ cups heavy (whipping) cream
- 2 tablespoon sugar
Topping:
- 1 lb fresh strawberries
Instructions
For Cake:
- Preheat oven to 350F. Spray three 6" cake pans with nonstick spray (see note).
- In a small bowl, combine dry ingredients (cake flour, baking powder, and salt). Set aside.
- In the bowl of a stand mixer, combine butter, sugar, and vanilla extract. Beat until light and fluffy. Scrape down the sides of the bowl.
- Add eggs, one at a time, allowing the first egg to fully incorporate before adding the second. Scrape down the sides of the bowl.
- With the mixer on low, add half of the dry ingredients. Mix until just incorporated, then add the buttermilk. Once combined, add the remaining dry ingredients, mixing until just incorporated.
- Divide batter among prepared pans (see note). Bake 15-20 minutes, or until a toothpick inserted in the center comes out clean. Allow cakes to cool in pans 5 minutes, then turn out onto wire racks to cool completely.
For Whipped Cream:
- Combine cream and sugar in the bowl of a stand mixer. Using the whisk attachment, beat the mixture on medium-high until stiff peaks form (be sure not to overbeat!).
Assembly:
- Place one cake on plate or cake stand, and top with about one cup whipped cream. Slice berries and arrange on top. Repeat with second layer.
- Place third cake layer. Top with remaining whipped cream, and arrange remaining berries as desired.Enjoy!
Notes
Note on cake flour: Cake flour lends a lighter texture and more tender crumb to the cake. If you can't find cake flour in your local grocery store, you can find it [here]. If you don't have cake flour, you can substitute with all-purpose flour, the cakes just won't be quite as tender.
Note on buttermilk: If you don't have buttermilk, you can make a quick substitution with milk (2% milkfat or greater) and vinegar or lemon juice. For this recipe, put 2 teaspoons lemon juice or vinegar into a liquid measure, then add enough milk to come up to the ⅔ cup line. Let sit for 5 minutes, then it's ready for use!
Note on pan size: I like the smaller size of this cake, but I realize that not everyone has 6" pans. You can also bake the cake in two 8" pans, but the bake time will be longer. (If you're interested, you can find 6" pans [here].)
Note on dark pans: If you have pans that are dark in color, reduce heat to 325F. This will help ensure that you don't end up with overdone, dry cake! Cakes will be done in about the same amount of time, but definitely check on them frequently.
Note on dividing batter/use of kitchen scale: I use a kitchen scale (like this one[here]) to weigh cake batter to ensure I'm dividing the batter evenly. This helps ensure even baking and layers that are equal in size. In this case, it came in even handier because I only have two 6" cake pans, so it would have been difficult to "eyeball" it. For this recipe, I had 24 ounces cake batter total, so I had 8 ounces cake batter in each of the pans.