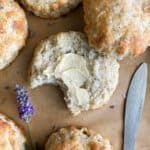
Lavender Biscuits
These Lavender Biscuits combine the comforting nostalgia of classic buttermilk biscuits with the enchanting flavor of lavender! Tender, flaky, and just a little sweet, you'll savor each bite!
Servings 12 biscuits
Calories 156kcal
Ingredients
- ¼ cup sugar
- 1 tablespoon dried lavender (see note)
- 2 cups flour
- 1 tablespoon baking powder
- ½ teaspoon salt
- ¼ teaspoon baking soda
- 6 Tablespoons unsalted butter, cold
- 1 cup buttermilk, cold (see note)
- coarse sugar, if desired
Instructions
- Preheat the oven to 450℉. Line a sheet pan with parchment (see note). Set aside.
- Pour a few tablespoons sugar and all the lavender into a coffee grinder. (If using a food processor, you may have to use ¼ cup sugar to get the lavender to process finely, as it has a larger bowl.)
- Process the sugar and lavender until the lavender is ground finely. This process nearly "powders" the sugar, which is why you don't want to process all the sugar with the lavender. Set lavender sugar aside.
- In a large bowl, combine the dry ingredients (flour, baking powder, baking soda, and salt). Stir to combine.
- Add the lavender sugar and remaining sugar to the bowl and stir to combine.
- Add the cold diced butter. Using a pastry blender (see note) or fork, cut the butter into the dry ingredients until no large pieces remain (the largest should be about the size of a pea).
- Add buttermilk (see note) and stir until the dough comes together. I find that a bowl scraper (see note) helps to bring the dough together without warming the butter.
- On a lightly floured surface, pat the dough out to about 1” thickness. Cut into biscuits. I used a 2.5” fluted cutter (see note). Be sure not to twist the cutter as you cut the biscuits, and this could impede them from rising. You may collect and pat out the dough scraps to cut additional biscuits.
- Place biscuits on the prepared pan and place in the freezer for 10 minutes before baking.
- Once chilled, sprinkle the tops of the biscuits with coarse sugar, if desired. To help ensure that the sugar sticks and to promote browning, you can brush the tops of the biscuits with milk prior to sprinkling with the sugar if you'd like. Bake the biscuits 12-15 minutes, or until risen and golden.
- Once completely cool, you can store these biscuits in an airtight container for up to 3 days on your counter. That said, they're definitely best right after they're baked.If you'd like to store them longer, they freeze beautifully and will keep for up to three months in an airtight container in the freezer!You can also freeze unbaked biscuits and bake them off as you need them. Just place the biscuits on a tray and freeze for about an hour. Then you can place the frozen biscuits into an airtight container, and they'll keep up to three months. No need to thaw them--you can just add a few extra minutes to the bake time and bake them up from frozen.Enjoy!
Notes
Note on lavender: You'll want to make sure that you're using culinary lavender, since other lavenders aren't meant to be eaten and could have been sprayed with harmful chemicals. If you're buying from a farmer's market or growing your own, English Lavender is the variety most commonly used in food. If you can't find dried lavender or prefer not to use it, you can instead substitute with 1 teaspoon of lavender paste.
Note on buttermilk: If you don't have buttermilk, you can make a quick substitution with milk (I find 2% milkfat or greater works best) and vinegar or lemon juice. For this recipe, put 1 teaspoon vinegar OR lemon juice into a liquid measuring cup, then add enough milk to come up to the 1 cup line. Let sit for 5 minutes, then it's ready for use!
Note on parchment: I like using nonstick parchment on my pans to ensure no sticking and for easier cleanup.
Note on pastry blender: While a pastry blender isn't necessary to cut in the butter (a fork will also work), it does make the job faster and easier.
Note on bowl scraper: I like using a bowl scraper to work the dough because its flexible shape makes the job much easier, and keeps your hands warming the butter as it comes together. They're easy to store and easy on the wallet!
Note on biscuit cutter: I used a 2.5" fluted cutter for my biscuits.
Nutrition
Serving: 1 biscuit | Calories: 156kcal | Carbohydrates: 21g | Protein: 3g | Fat: 7g | Saturated Fat: 4g | Polyunsaturated Fat: 0.3g | Monounsaturated Fat: 2g | Trans Fat: 0.2g | Cholesterol: 17mg | Sodium: 248mg | Potassium: 51mg | Fiber: 1g | Sugar: 5g | Vitamin A: 212IU | Vitamin C: 0.1mg | Calcium: 89mg | Iron: 1mg